


Wanna talk?
HairTalk® is the place for you!

Copyright 1997-2024, hairboutique.com, All Rights Reserved.

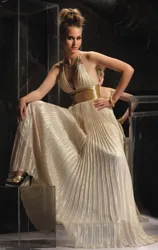
 This stunning gown from Jovani's 2009 Prom Collection combines a sculpted ribbon belted waist with a strapless fitted top that directs attention to lovely cleavage, sexy shoulders, beautiful back and neck.
The top is a perfect composition of stunning yet elegant and sophisticated bling with a long and flowing gown.
(Image of Jovani 2009 Prom Gown - Jovani - All Rights Reserved).
The Jovani Model is wearing her hair in an edgy but traditional style updo with a sleek side swept off-the-face fringe, a beautifully backcombed crown which gives the proper balance to the hair style.
The back of the hair is carefully smoothed and pinned into a French Twist seam with the top of the Twist billowing out over the top of the crown.
How To Recreate This Prom Hair Updo
 This updo hairstyle requires hair that is medium to thick and either shoulder length or slightly longer. Short or medium length hair can have this hairstyle when the natural hair is enhanced with semi-permanent or temporary clip-in hair extensions to provide the proper amount of hair to create crown lift.
This Prom updo hairstyle is designed for hair that is either naturally straight or has been temporarily straightened before styling.
 Step By Step Instructions
Follow the styling instructions below to recreate this French Twist style updo hairstyle which is a favorite of celebrities such as Eva Mendes and Jennifer Lopez.
You may wish to have a professional hairdresser or family member (or friend) help you create this hairdresser to achieve the beautiful shape and finish. If you decide to do it at home the key is to spend time practicing before the night of your Prom.
Before You Start
Make sure you have all the proper tools including plenty of hairpins, a good brush and comb at hand as you begin. If you wish to add hair accessories make sure you have them ready to be added to the style at the end.
 Step 1: Create this style on hair that is not freshly washed since it may be too slippery to remain securely pinned. If you wish to shampoo your hair
![]() before creating the style, apply a good styling product to give your hair necessary texture and hold.
before creating the style, apply a good styling product to give your hair necessary texture and hold.
Step 2: Use a boar's head or similar type of high quality styling tool to brush all hair smoothly back from the forehead.
Step 3: Select a long tail comb and create a desired fringe part. You may wish to select a center part as demonstrated by Eva Mendes or go with the side swept part worn on the beautiful Jovani model.
Step 4: Take your thumbs and place them on either side of your ears underneath the hair and lift to create a separate hair section extending from the sides up towards the crown.
Step 5: Use a 100% boar's bristle brush and gently back comb the sides and the top to create as much fullness and volume as possible. Keep backcombing until you have the desired height. Once you have the sides and crown back combed to your desired level, carefully smooth the side and top sections with your hands.
Step 6: Use your hands to smooth and gather the reminder of your hair into a tight ponytail with a base halfway between your crown and nape and slightly to the left of center. Make sure that the pony section is very smooth. Once you have it in place hold it with your hands but do not pin or anchor it.Step 7: Holding the entire ponytail twist it all the way around twice, in a clockwise direction. This twisting action will hold the base of your hair closer to your head and give you a tight base to work against.
 Step 8: Hold the base of the ponytail in your left hand. With your right, hold its end up, pointing directly up towards the ceiling.
Step 9: With your right hand, gently fold the end of the ponytail, about the top third, down towards the nape of your neck.
Step 10: Fold the entire ponytail down under itself, towards your nape so that is it less than half as long as it was.
Step 11: Curl the folded ponytail in your left hand. There should be a slight hollow between the ponytail and your scalp.
Step 12: With your right hand, begin to gently push the upper right hand portion of the folded ponytail down into the hollow.
Step 13: Continue pushing the hair underneath your left hand into the hollow so that the folded ponytail is slowly rolling inside the hollow.
Step 14: The twist is complete when you can't push any additional hair into the hollow and the folded ponytail has become a tight roll.
 Step 15: Create a seam by tucking in bobby pins
![]() that are the same color as your natural hair along the line formed where the right hand edge of the roll meets your scalp starting at the bottom.
that are the same color as your natural hair along the line formed where the right hand edge of the roll meets your scalp starting at the bottom.
Step 16: Place bobby pins all along the seam up to the top of the roll, concealing them just under the roll.
Begin to push the upper portion of the ponytail over into the space with the other hand, so that the folded part is slowly rolling over into it.
Step 17: When you have pushed all the hair in, secure with hairpins along the seam formed by the joint, starting at the bottom. Conceal the hairpins by pushing them right underneath the roll.
Step 18: Integrate the backcombed sides and crown areas into the finished twist and pin into place.
Spray with with firm hold hairspray. Once the hairspray has dried completely, add a gorgeous jeweled hair clip, silk flower or attach a glittery headband or tiara comb.Please follow us on Twitter at: https://Twitter.com/HairBoutique. I look forward to meeting new people from all walks of Twitter and learning from their Tweets.

